आओ जाने कैसे अपने Blog के किसी भी पोस्ट के बीच में Google Adsense का इस्तेमाल किया जाए?
1. सबसे पहले आपने अपने Google Adsense अकाउंट में लोग-इन करें
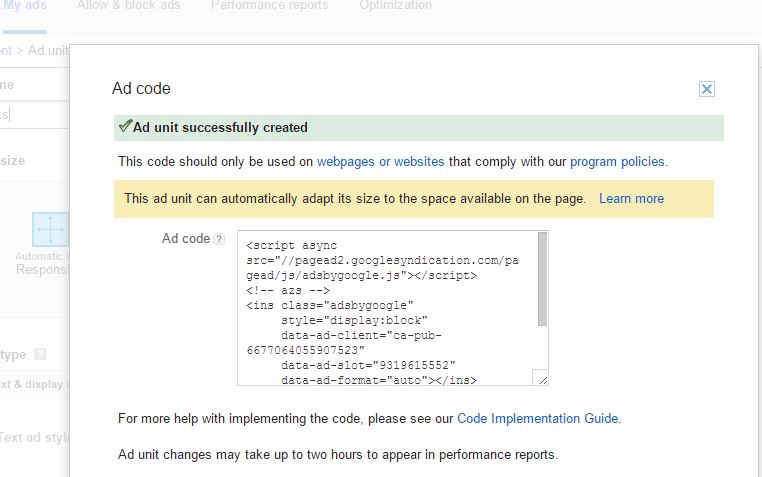
2. अब आपने My ads पर क्लिक करके New ad unit पर क्लिक करना होगा

3. अपने Ad का नाम डालें, यहाँ आप जो चाहे वो नाम डाल सकते हैं इससे कोई फर्क नहीं पड़ता
और अपनी पसंद का कोई भी साइज़ ले लें

अब निचे Save and get code पर क्लीक करके कोड पर जाएँ

4. अब आपके सामने कोड आजायेगा उसे आपने Copy करना है

5. अब आपको उस कोड को इस लिंक पर जाकर Convert करना होगा
HTML to XML PARSER Convertor


1. सबसे पहले आपने अपने Google Adsense अकाउंट में लोग-इन करें
2. अब आपने My ads पर क्लिक करके New ad unit पर क्लिक करना होगा

3. अपने Ad का नाम डालें, यहाँ आप जो चाहे वो नाम डाल सकते हैं इससे कोई फर्क नहीं पड़ता
और अपनी पसंद का कोई भी साइज़ ले लें

अब निचे Save and get code पर क्लीक करके कोड पर जाएँ

4. अब आपके सामने कोड आजायेगा उसे आपने Copy करना है
5. अब आपको उस कोड को इस लिंक पर जाकर Convert करना होगा
HTML to XML PARSER Convertor

6. Adding Google Adsense in Blogger Below Post Titles
- Open your Blogger Dashboard >> Template.
- Backup your current blogger template.

- Copy all the template code and paste that into notepad. (to find the below code)
- Press Ctrl+F and search for <data:post.body/>. You might find this code more than one time but, you’ve to work with the second one.
- Now, place the below code just above <data:post.body/>
<b:if cond='data:blog.pageType == "item"'>PLACE YOUR AD CODE HERE</b:if>
- Now, replace the PLACE YOUR AD CODE HERE with the Parsed Ad Code.
- Click on Save Template button.
- Done!!
Once you’ve performed the all above mentioned steps, then open your blog and visit any your blog posts. The Adsense Ad unit placed below post title will look something like this:
The AdSense ad unit will appear on the left side between article title and article content. If you don’t like ad placement and want to show it at the center or the right side, then use the below code.
<b:if cond='data:blog.pageType == "item"'><div align="center">PLACE YOUR AD CODE HERE</div></b:if>
Then your ad placement will look something like this:
Ad below post title in Center
If you want to move your ad to the right side, simply change center from the above code to right . That's it.
If you’re still unhappy with the ad placement, you can try wrapping your content around the Google Adsense Ads (as shown in the image below):
To do this, use below code:
<b:if cond='data:blog.pageType == "item"'><div style="float:left; margin:10px;">PLACE YOUR AD CODE HERE</div></b:if>
Replace left to right if you want to show ads on the right side wrapped with text.
Note: Once you’re done with placing your desired code, don’t forget to cross-check that all the codes are added between the conditional tags that will make ads appear only on the post pages (neither homepage nor labels/archives page). If you want to show ads below post title on every page of your blog then, just remove those conditional tags. (lines in blue color.)
If you are showing the ad on homepage and label pages also then take a look at your ad. It will be shown below all post’s titles means if you have set 5 posts to appear on your homepage then it will only appear below first three post’s titles. Last two will be shown as blank white space. On those, you can mind placing info links referral program banner ads to make some extra money.
But, I will recommend you to show ad below first post title only as too many ads will make your website look like spam. For doing that, replace above conditional tags with below ones to show the single ad on homepage and labels page belowfirst top most post’s title.
<b:if cond='data:post.isFirstPost'>PLACE YOUR AD CODE HERE</b:if>
It’s your turn
So, these were all the ways to put Google Adsense ads below the post title. As I mentioned above, you can also use some other ads below post title as well. Now, it’s your turn to check which format and ad size work best for increasing CTR of your blog. If you want to increase your ad revenue, then these tips might help you.
Please share your views with me on increasing Adsense and revenue through comments. Happy Making Money!
Comments
Post a Comment